|
Years ago, my grandma used to make us Chicken Cordon Blue every so often for our Sunday family dinners. It was one of my favorite things she made. Come to find out, she didn't make it from scratch. Ha! Our family business sold them premade, so she really just baked them. Regardless, the dish always reminds me of her. I wanted to come up with an easier version of it, but one that's still as delicious. This Chicken Cordon Blue Pasta Casserole was just the ticket! It's pretty quick and easy to make, still highlights all the delicious chicken, ham, and swiss flavors, and is topped with a crispy bread crumb topping to mimic the breading of the chicken. So yummy! I think grandma would enjoy this one.  CHICKEN CORDON BLUE PASTA CASSEROLE Makes about 8-10 servings INGREDIENTS:
2 tbsp. butter 6 large garlic cloves, minced 2 tbsp. flour 1 cup heavy whipping cream 2 cups whole milk 2 1/2 cups swiss cheese 4 ounces cream cheese 1/2 cup sour cream 1 tbsp. dijon mustard 1 tbsp. fresh thyme 2 tbsp. fresh chives, minced 1 tsp. salt 4 cups shredded chicken (from 1-2 large rotisserie chickens) 8 ounces smoked ham, cut into small cubes 12 ounces bite-sized pasta of choice (penne, macaroni, rigatoni, fusilli, cavatappi all work well) 3/4 cup panko bread crumbs 3 tbsp. butter 1 tsp. garlic salt 1 tbsp. chives, minced INSTRUCTIONS: In a large saucepan or stock pot, bring water to a boil and cook pasta according to package instructions. Meanwhile, in a large saucepan, melt 2 tbsp. butter over medium heat. Add the garlic and cook for 1 minute. Add the flour and cook for 1 more minute. Stir in the heavy cream until smooth, then add the milk. Bring the mixture to a simmer, then stir in the swiss cheese, cream cheese, sour cream, dijon, thyme, chives,and salt. Stir until sauce is smooth. Reduce heat to low. Stir in the chicken and ham. Once the pasta is done cooking, toss the pasta with the sauce, then pour the mixture into a 9x13 inch baking dish. Cover with foil while you make the panko topping. In a sauté pan, melt 3 tbsp. butter over medium heat. Once melted, add the garlic salt and pank bread crumbs and toss to coat. Stir and toss the bread crumbs frequently for about 3 minutes until golden brown. Stir in the chives, then sprinkle the mixture over the pasta. Serve immediately.
0 Comments
Have you ever tried grilled melon? If not, you're missing out! I am a huge fan of any kind of grilled fruit. I love the smoky flavor mixed with the sweetness, and how the sugars in the fruit create a beautiful char. This Grilled Cantaloupe and Prosciutto with Burrata was no exception. It was incredible! This dish makes an excellent appetizer prior to dinner, or a nice snack to enjoy on a patio on a sunny day, sipping some white wine.  The first step in grilling is to make sure your grill is hot and clean. I use a gas grill and preheat it for a good 10-15 minutes on high. Once the grill is preheated, I use a grill brush and sometimes a scraper to clean off the grates. To grill the fruit, first make sure you have nice and ripe cantaloupe to work with. Use a sharp knife to cut the cantaloupe in half lengthwise, then scoop out the seeds and gooey-ness from the inside. Next, trim off the rind, and then slice into about 5-6 slices. Brush the cantaloupe with olive oil. Right before I place the cantaloupe on the grill, I use tongs and a paper towel that's been dipped in olive oil to quickly brush the grill grates. Then I place the cantaloupe on the grill. (Oiling the grates isn't usually necessary, but I like to take a little extra precaution so that the fruit doesn't stick to the grill.) I let the slices grill for about 3-5 minutes per side, until they got some good grill marks and a bit of char. Use a good pair of tongs with metal ends to flip and remove the cantaloupe. They are much easier to work with.  GRILLED CANTALOUPE AND PROSCIUTTO WITH BURRATA Makes 4 servings INGREDIENTS:
1/2 cantaloupe melon 1/2 loaf Como bread, cut into 1" thick slices (any rustic style white bread would work) 2 tbsp. olive oil 3 oz. prosciutto 16 oz. burrata cheese 1/4 cup basil leaves, whole or chopped 1 tbsp. olive oil INSTRUCTIONS: Preheat your grill on high for 10-15 minutes. Once preheated, clean the grill with a grill brush and scraper if needed. Using a sharp knife, carefully slice the cantaloupe in half lengthwise. Remove the core and seeds, then trim off the ride of the melon. Slice the cantaloupe into 5-6 slices. Brush the cantaloupe slices and bread slices with olive oil on both sides. Place the cantaloupe and bread on the grill. Grill the bread for only about 1 minutes per side, keeping a close eye on it, as it may burn quickly. Grill the cantaloupe for 3-5 minutes per side, until you see nice grill marks and a bit of char. Transfer the melon and bread to a clean plate and allow to cool. Cut the cantaloupe slices and bread slices in half. Arrange the cantaloupe, prosciutto, burrata, fresh basil, and bread on a serving platter and drizzle with 1 tbsp. olive oil prior to serving. This bright and springy salad was actually inspired by this gorgeous chevre I found at a cheese shop in Anchorage, Alaska called Fromagio's. It's called Tea Rose from Capriole Goat Cheese, a goat dairy in Greenville, Indiana. On their website, they call Tea Rose a "breath of Spring". And it certainly is! This goat cheese pleasantly lacks the funk that a lot of goat cheeses tend to have, and instead is bright and tangy. It's coated with fennel pollen, fresh herbs, and dried flower petals that are found around their farm, so it has really nice floral/herbal notes as well. And I mean, just look at it! Isn't it just the most beautiful cheese you've ever seen?  Am I geeking out too much about this cheese? If I am, sorry! A little known fact is that I worked at a goat dairy for a few months back in 2015 in Longmont, Colorado. I mainly handled the sales logistics, but I got to indulge in all different kinds of award-winning goat cheeses every day. So obviously I'm a huge fan of goat cheese and tend to geek out on it.  I wanted to come up with a salad that would compliment the cheese and embody that same "breath of Spring" vision. Looking at the color palette of the Tea Rose and considering the bright crispness of its flavor, the rhubarb and fennel were obvious choices to me. Roasting them both brings out their flavor and natural juices, allowing the ingredients to shine rather than being masked by a salad dressing. This is definitely my favorite salads this spring, so I hope you try it! Let me know what you think in the comments below!  ROASTED RHUBARB FENNEL & GOAT CHEESE SALAD Makes 2 servings INGREDIENTS:
3-4 medium stalks of rhubarb, cut into 1" sections (about 3 cups) 3 tbsp. honey 2 large fennel bulbs, stalks removed & thinly sliced 1 tbsp. olive oil 1 cup baby arugula 1/4 cup walnuts, chopped 2 ounces goat cheese, crumbled (preferrably Capriole's Tea Rose!) 1 tbsp. lemon zest, to garnish Fennel fronds, to garnish INSTRUCTIONS: Preheat oven to 450° F. Line two small baking sheets or dishes with foil, then spray the foil with oil. On one of the prepared baking sheets, spread the rhubarb in a single layer. Drizzle the honey over the rhubarb. Roast in the oven for about 8-10 minutes, or until the rhubarb has softened. Keep a close eye on it so the honey doesn't burn. Remove from oven and allow to cool completely. Reserve the juices that have collected on the foil. In a large bowl, toss the fennel with the olive oil. Spread it out in an even layer on the second prepared baking sheet. Roast for about 20 minutes, just until it starts to brown a bit around the edges. Remove from oven, transfer the fennel to a bowl and allow to cool completely. On the same pan as the fennel, arrange the walnuts in a single layer. Place in the oven for 5 minutes to toast. Remove and allow to cool completely. Arrange the arugula on a serving platter or individual plates, then top with the rhubarb, fennel, walnuts, and goat cheese. Drizzle the reserved juices from the rhubarb over the salad, and garnish with lemon zest and fennel fronds. I bet you haven’t grilled nearly enough vegetables! Grilling isn’t just for meats, you know. Grilling vegetables and even fruits will take them to a whole other level. The smokiness and bit of char create such flavorful veggies. You’ll just want more and more! 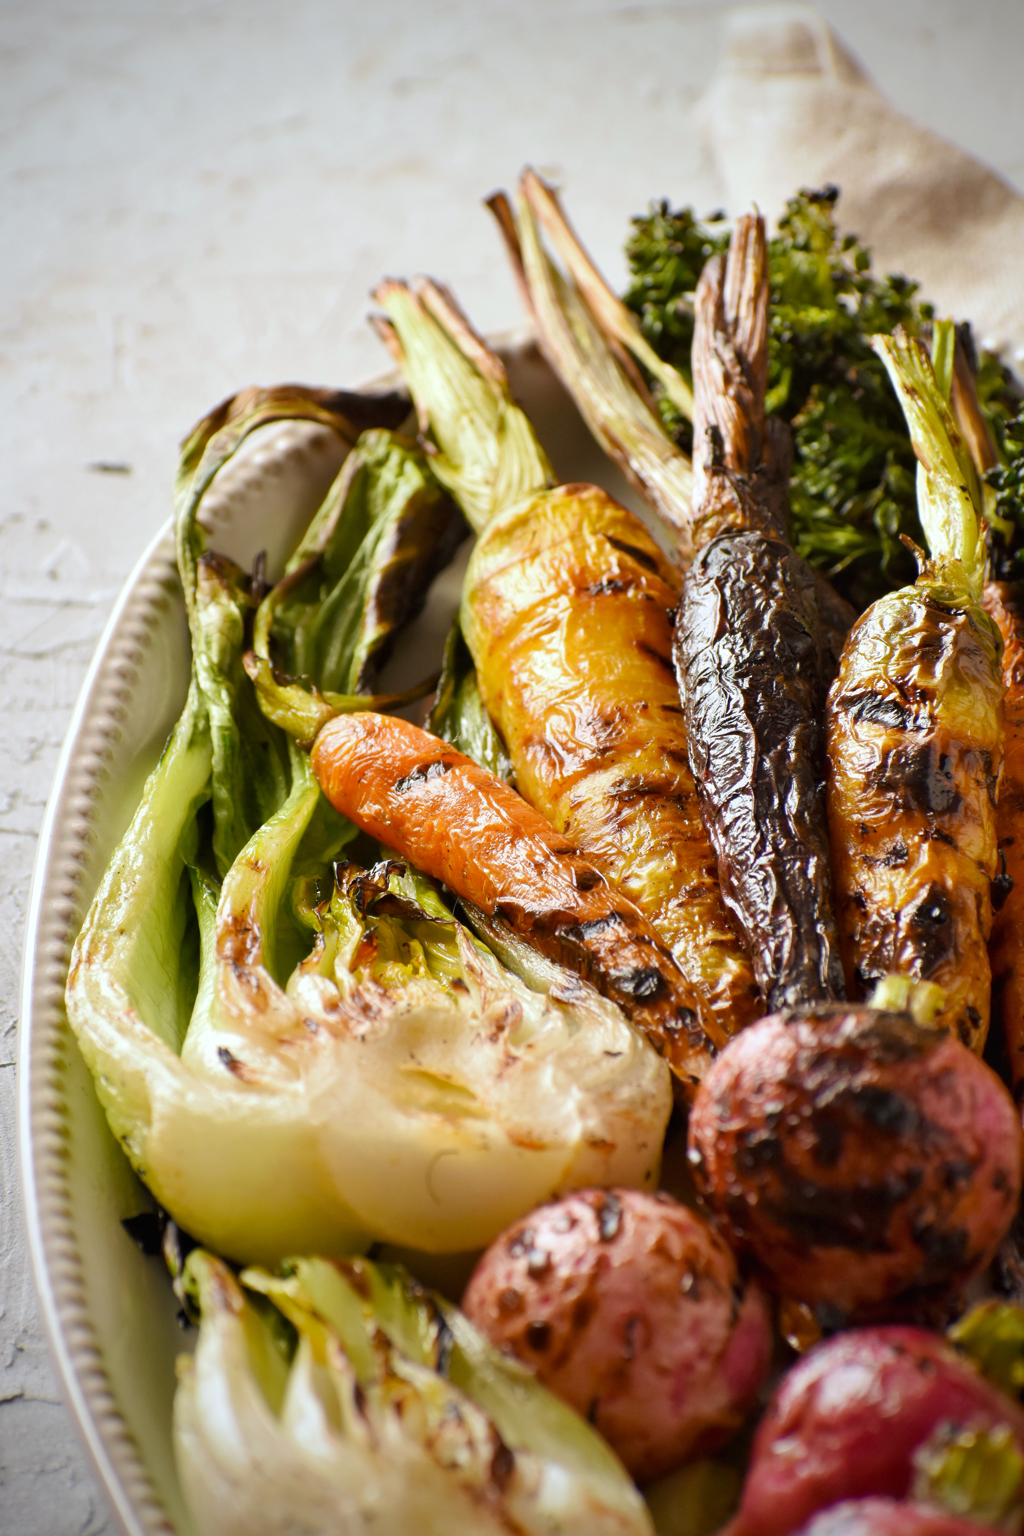 Helpful tips for grilling your veggies.
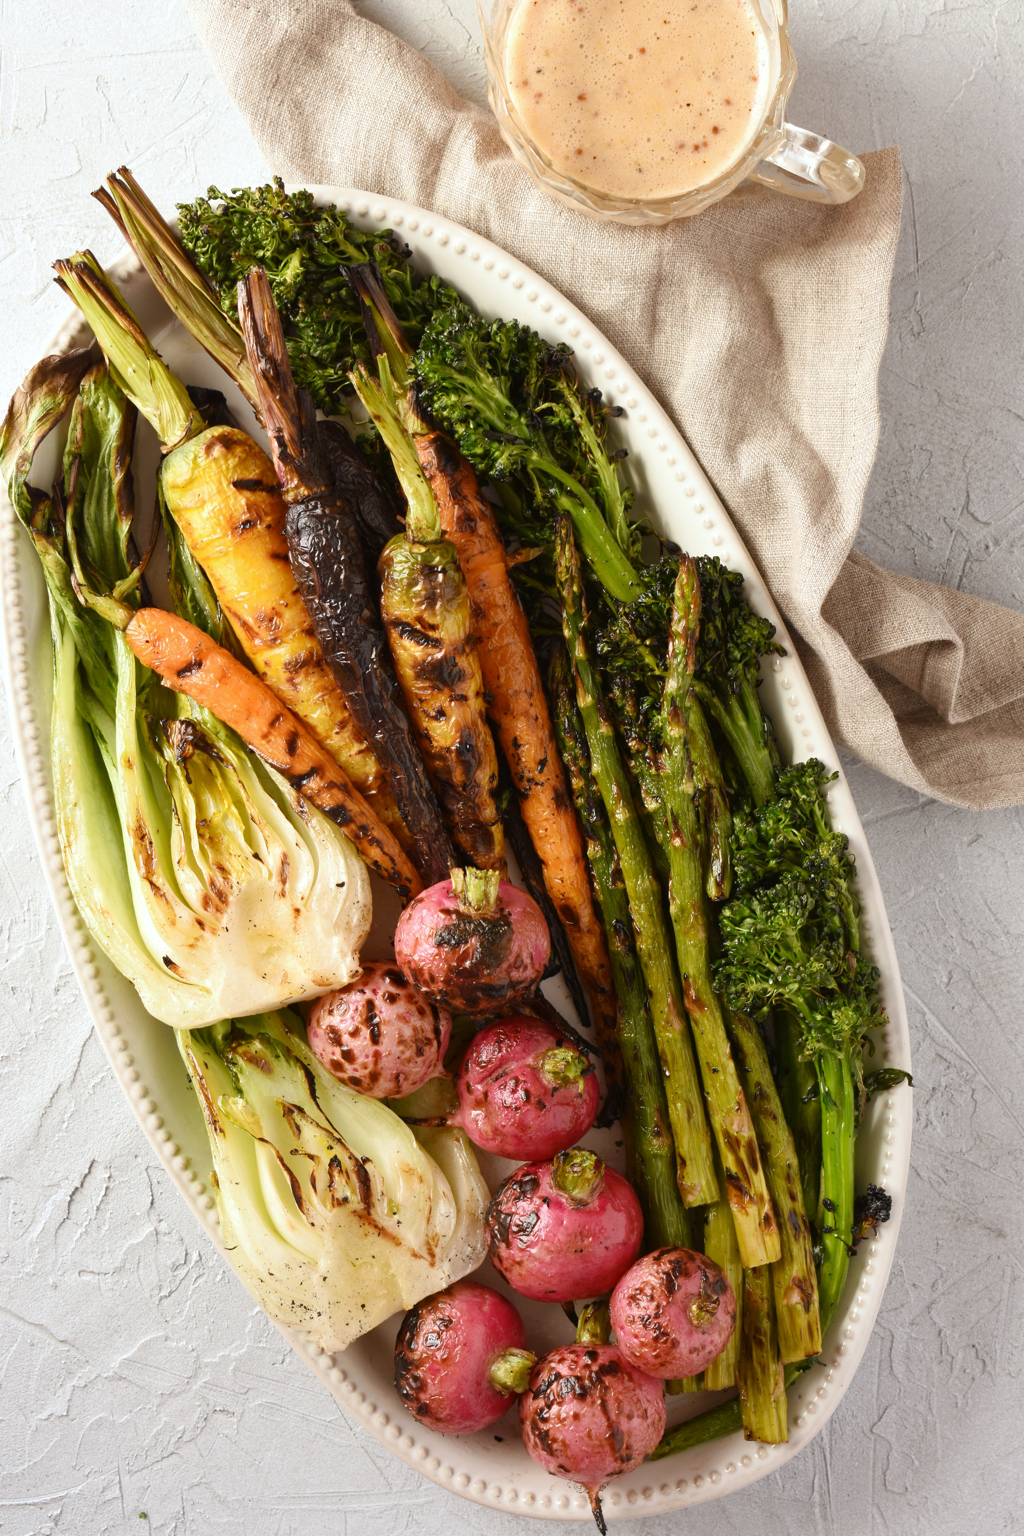 GRILLED SPRING VEGGIE SALAD WITH WHOLE GRAIN MUSTARD VINAIGRETTE Makes about 4-6 servings INGREDIENTS:
Veggies: 6-8 small carrots (3/4” thick or less), greens removed and rinsed 6-8 large radishes, greens removed and rinsed 1 large bunch broccoli rabe, 1/2” of the ends trimmed off 10-15 asparagus spears, 1” of the ends trimmed off 2 baby bok choy, rinsed and cut in half lengthwise 1/4 cup olive oil Chunky sea salt, to taste Other veggie alternatives: 1 red onion, peeled and quartered lengthwise 1 small bunch kale, stems trimmed 2-3 turnips, rinsed and halved or quartered lengthwise 1 head of romaine lettuce, rinsed and halved lengthwise Vinaigrette: 2 tbsp. whole grain mustard 1 tbsp. honey 2 tbsp. red wine vinegar 3 tbsp. olive oil 1/2 tsp. salt 1/4 tsp. black pepper INSTRUCTIONS: Preheat your grill for 10-15 minute on high. Once preheated, clean the grates with a spatula or grill brush. Reduce the heat to medium-high. Brush all sides of each veggie generously with olive oil. Place the carrots on the grill first. After about 2 minutes, place the radishes on the grill and rotate the carrots. After 2 minutes, rotate the radishes and the carrot, then again after 2 more minutes. Add the broccoli rabe, asparagus, and bok choy. Every 2 minutes, rotate the veggies and flip the bok choy until they are evenly cooked with bits of char. Once the veggies are done, transfer them to a platter. Using a blender or small bowl with a whisk, mix together all ingredients for the vinaigrette. To serve, arrange the veggies on a serving platter and drizzle with the vinaigrette, or chop the grilled veggies into large bite-sized pieces and toss with the vinaigrette. This twist on the classic Italian pasta dish will brighten up any dinner table! Traditionally, cacio e pepe (meaning “cheese and pepper” in Italian, and pronounced “kah-cheeoh eh peh-peh”) has 4 simple ingredients... pasta, water, Pecorino cheese, and black pepper. The pasta is typically spaghetti, and the starchy pasta water is added to melt the cheese and turn it into a rich creamy sauce. For this recipe, I have chosen a heartier pasta, bucatini, which is sorta like a thick hollow spaghetti, but you certainly use spaghetti, linguine, or fettuccine with this recipe too. Then I added lemon, fresh basil, and spinach to brighten up the flavors and lighten the richness of the dish.  LEMON BASIL CACIO E PEPE Makes 2 servings INGREDIENTS:
1 tbsp. olive oil 4 oz. bucatini pasta 1 cup pecorino romano cheese, finely grated 2 tsp. cracked black pepper 3 tbsp. lemon zest Juice from 1 lemon 3 tbsp. fresh basil, roughly chopped 2 cups baby spinach Grated pecorino, to garnish Lemon zest, to garnish INSTRUCTIONS: In a large pot, bring water to a boil over medium high heat, then add 1 tbsp. olive oil, then the bucatini pasta. Cook the pasta per package instructions. Drain the pasta, reserving 1 cup of the pasta water prior to draining. Return the pasta to the saucepan and lower the heat to medium low. While the pasta is boiling, in a small bowl, mix together the pecorino, black pepper, lemon zest, lemon juice, and basil. After you drain the pasta, add about 1/2 cup of the reserved pasta water to the cheese mixture and stir quickly. Add the mixture to the pasta and toss quickly, adding more pasta water as needed to create a creamy sauce. Stir in the baby spinach until wilted. Serve immediately, garnished with grated pecorino and lemon zest. Usually when you think of steaks, you think of grilling and that smoky flavor and bit of char that you get from the flame. But grilling isn’t the only way to cook a steak! Pan searing steaks with a little butter, garlic and herbs will produce a tender, richly flavored piece of meat. In my opinion, pan searing is easier and produces more consistent results than grilling, since you have a more consistent heat source compared to a flame. I also find ribeyes in particular to be ideal of pan searing due to their fat content. The pan catches all the fat that breaks down and melts away, juices which on a grill would just drip down and burn off. So the steak ends up basting in its own fat, leading to a juicy, flavorful steak. Basting it with butter on top of that only adds to the luscious flavor. 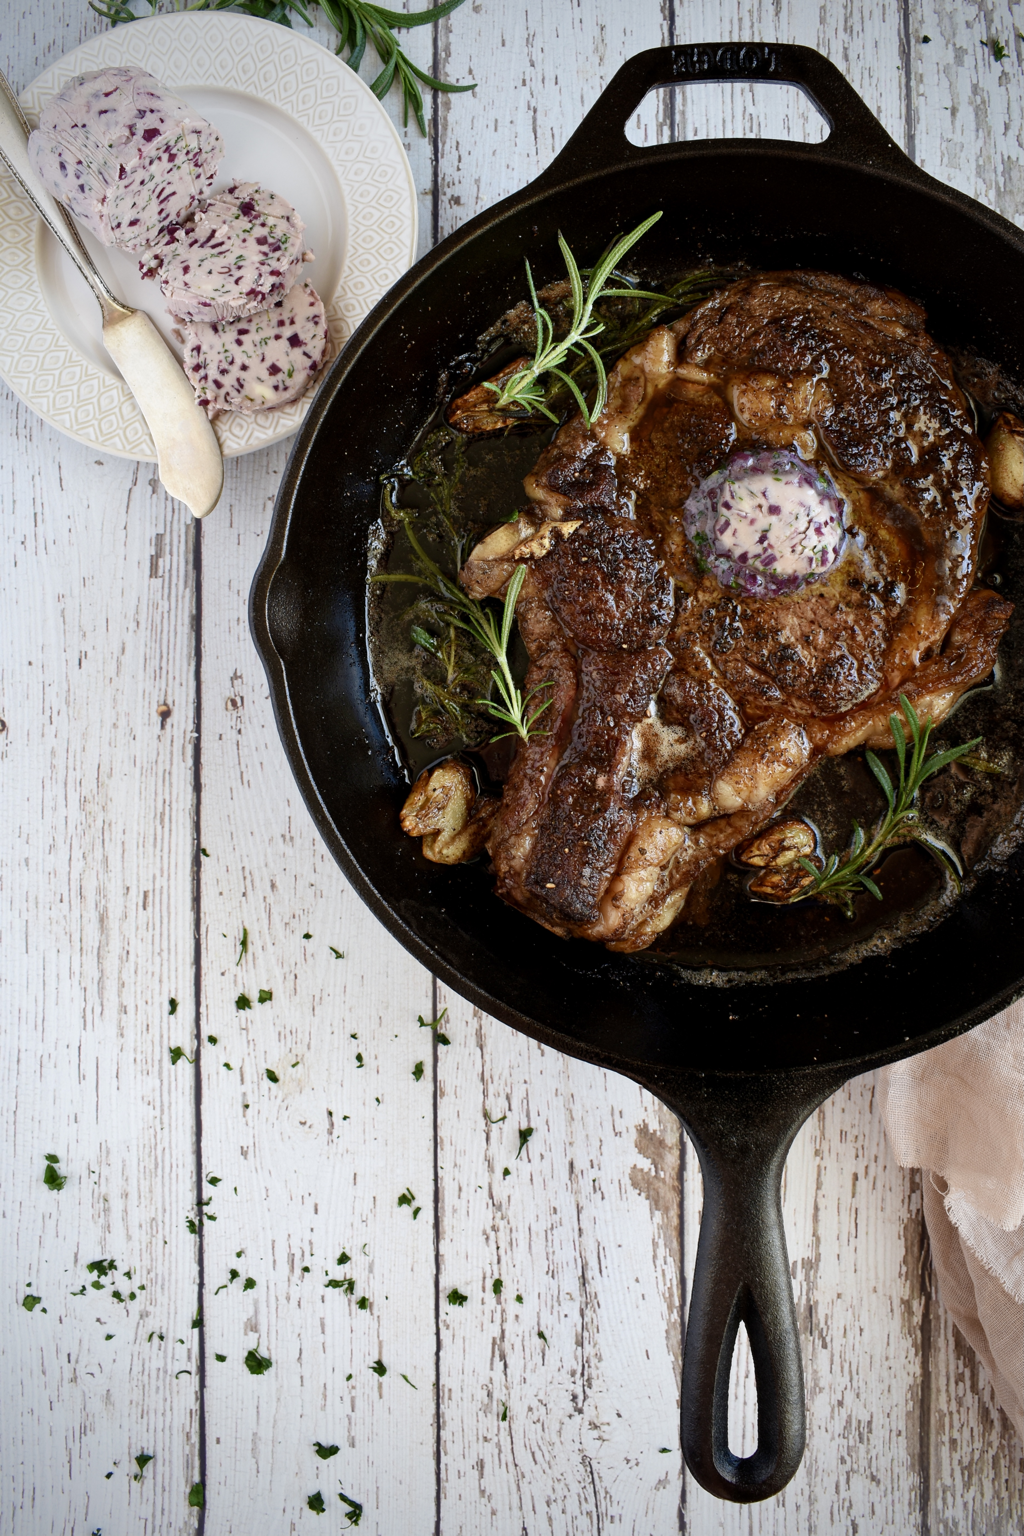 This Red Wine Shallot Butter is considered a compound butter. A compound butter is simply a mixture of butter and other ingredients. Compound butters are used to enhance the flavors of a dish or may be used as a sauce. This butter recipe is excellent on steaks, but may also be tossed with pasta or spread on warm rolls. It will keep for about a week in the refrigerator, or up to a few months in the freezer. 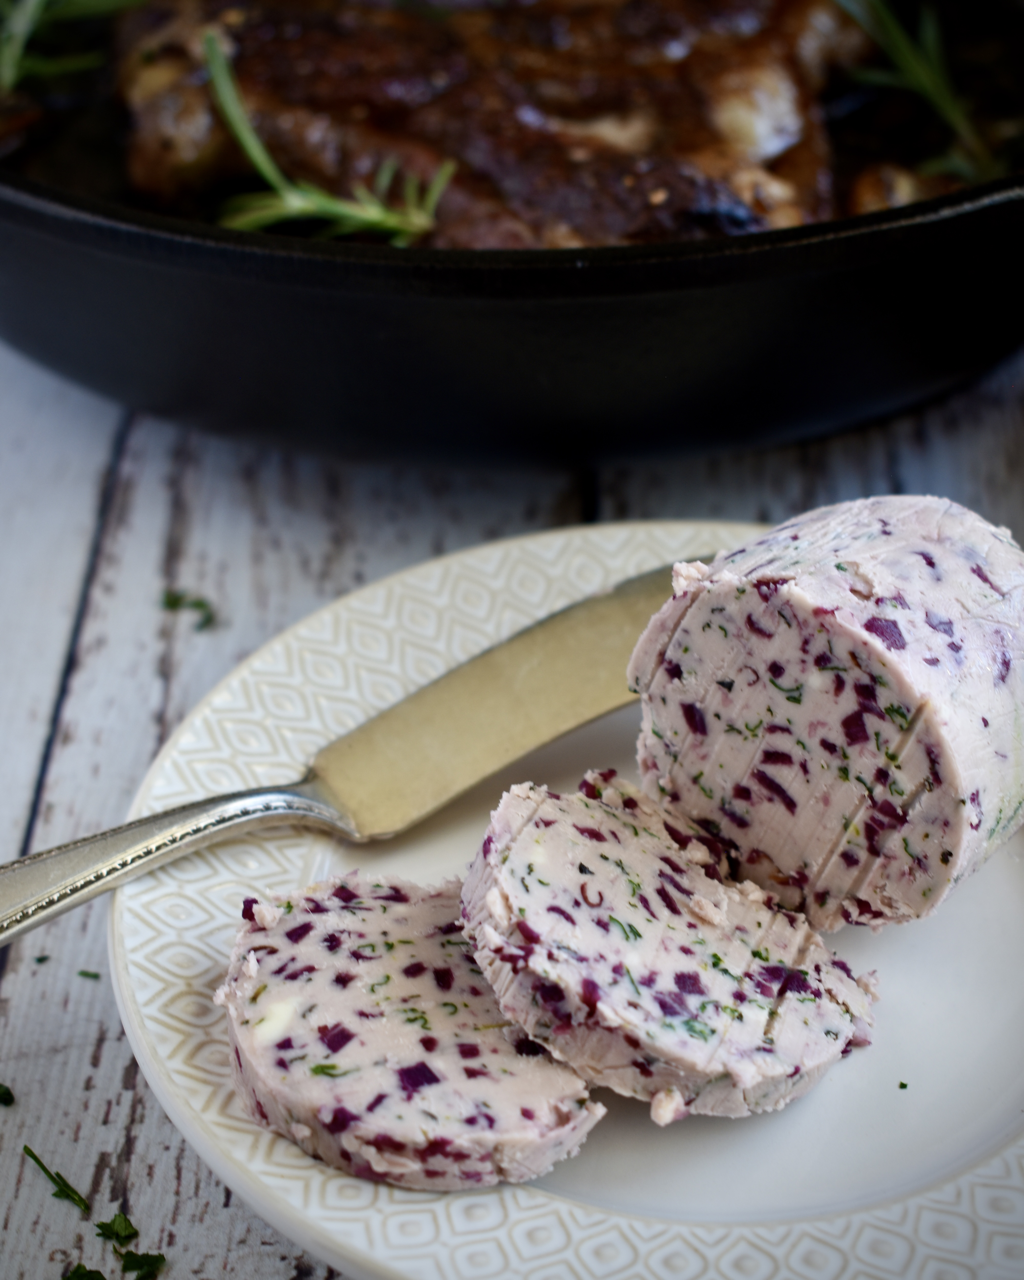 PAN SEARED RIBEYE STEAK WITH RED WINE SHALLOT BUTTER Makes 2 servings INGREDIENTS: Steaks: 2 bone-in ribeye steaks 1 tbsp. salt 1 tbsp. black pepper 1 tbsp. garlic powder 2 tbsp. brown sugar 1 tbsp. fresh rosemary, minced 2 tbsp. olive oil 4 tbsp. butter 8 whole garlic cloves, smashed 4 sprigs fresh rosemary Red Wine Shallot Butter: 1/2 cup butter, softened 3 tbsp. shallots, finely minced 1/4 cup red wine (such as a cabernet sauvignon, merlot, chianti, or malbec) 1 tbsp. fresh rosemary, minced 1 tsp. fresh parsley, minced 1/4 tsp. salt Pinch of black pepper INSTRUCTIONS: Red Wine Shallot Butter (Make Ahead): Melt 1 tbsp. of butter in a sauté pan over medium heat, then add the shallots and cook for about 2 minutes, just until the shallots begin to turn golden around the edges. Pour in the red wine and cook for about 2 minutes or until most of the liquid has evaporated. Remove from heat and stir in the rosemary, parsley, salt, and pepper. Allow the mixture to cool completely. In a small bowl, combine the shallot mixture with the remaining softened butter. Stir until well blended. Refrigerate the butter in the bowl or place it on a piece of plastic wrap that’s about a foot long. Roll up and shape the butter into a log using the plastic wrap, twisting the ends to seal it and keep the butter compact. Place in the refrigerator until solid, at least 1 hour. Bring the butter to room temperature again prior to serving. Steaks: Remove the ribeye steaks from the refrigerator 30 minutes prior to cooking. Pat the steaks dry with a paper towel. In a small bowl, mix together the salt, pepper, garlic powder, brown sugar, and rosemary. Sprinkle the mixture on both sides of the steaks and press to adhere it to the steaks. Set aside. If your steaks are more than 1” thick, or you prefer a more well done steak, preheat oven to 375° F. When ready to cook the steaks, heat a cast iron skillet or heavy bottomed, oven-safe pan over medium heat. Once the pan is hot, add 1 tbsp. olive oil and 1 tbsp. butter. Once the butter has melted, add one of the ribeyes to the pan. Cook for about 4-5 minutes, or until the steak is nicely browned, then flip. Add 1 more tbsp. of butter, 4 cloves of garlic, and 2 sprigs of rosemary to the pan alongside the steak. Cook for 4-5 more minutes, until browned. During the last couple minutes of cooking, tilt the pan slightly to allow the butter and juices to collect on one side of the pan, then use a spoon to continuously baste the steak with the juices. Check the temperature of the steak by using an instant read thermometer or inserting a thermometer into the side of the steak. Medium rare is 135° F and an ideal temperature for ribeyes. If needed, flip the steak one more time and cook for 2-3 minutes or place the pan in the oven and cook until you reach your desired doneness, checking the temperature every 2-3 minutes. Once the steak is done, transfer it to a plate and allow it to rest before serving or slicing. If you are only cooking 1 steak, place 1-2 tbsp. of the red wine shallot butter on top of the steak, and allow the steak to rest for about 3-5 minutes before to serving. If you are cooking 2 steaks, slightly undercook the first steak, then transfer it on a plate and cover the plate tightly with foil. Set aside. Repeat the process above for cooking the second steak. While the second steak is resting, sear the first steak again for 1 minute on each side, just to warm it up. Transfer to a plate or serving platter, top each steak with 1-2 tbsp. of red wine shallot butter, then serve. Store any leftover butter in the refrigerator for up to 1 week. 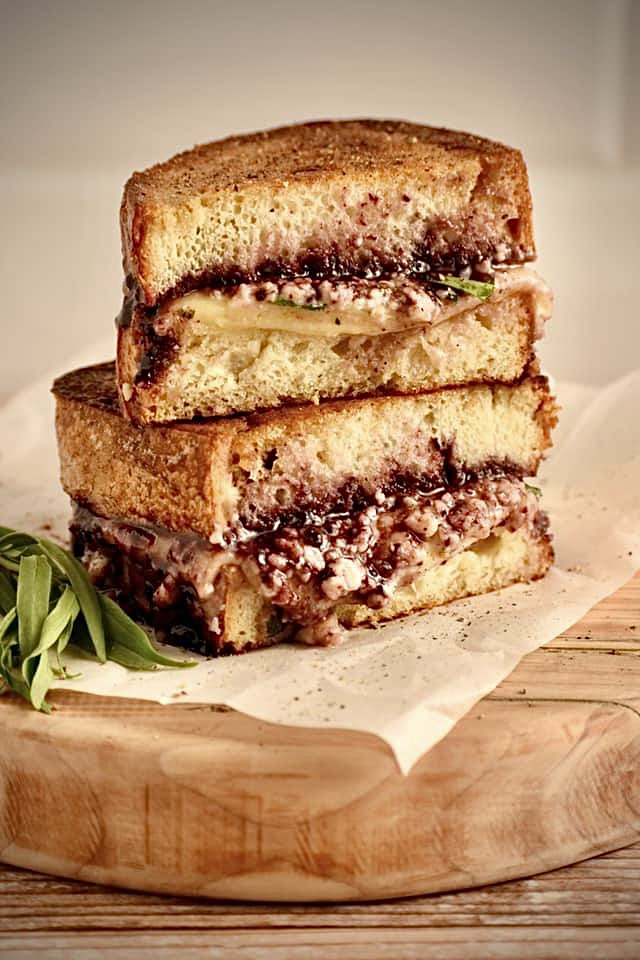 Let’s talk grilled cheese! It’s a classic combo. At its very basic, it’s bread and cheese, heated and toasted in a hot pan until the bread is golden and the cheese is melted. But the type of bread, the type of cheese(s), the fat used to toasted the bread, the additional ingredients and condiments.... the possibilities are endless! Bread. A good grilled cheese starts with the bread. Bread is what gives the sandwich its structure. Sure, a basic pre-sliced sandwich bread will do, but for a grilled cheese like this Black and Blue, you need something with a little more girth. My favorite kind of bread for any grilled cheese is como bread. You can usually find it in your regular grocery store’s bakery. It’s like rustic Italian or French loaf that’s dense and soft on the inside and a chewy, slightly crispy crust. It also allows you to dictate how thick or thin the slices are. I prefer mine a little thicker, around 3/4” thick. Cheese. Quality cheeses are what separates a good grilled cheese from a great grilled cheese. Always splurge a little on the cheese when making a “fancy” grilled cheese. You want a cheese that melts easily, but also adds a little intrigue to the sandwich. For this Black and Blue, since Gorgonzola doesn’t melt very fast, I combined it with another sharp cheese that would get that ooey gooey quality that we all love when it comes to grilled cheese. The melted white cheddar also helps bind together the bread and other ingredients. Fat. I grew up thinking the only you made grilled cheese was by spreading butter on the outsides of the bread and searing it in a hot skillet. And yes, a good spread of butter does make for a deliciously crispy grilled cheese. But recently I discovered using mayo in place of butter. At first, I thought the idea was odd, but really, mayo is basically a fat mixed with egg, so it makes sense that it would work for grilling. It more consistently achieves a beautiful golden color on the bread and a crispy crunch. And it imparts a very slight tang to the flavors, which for this Black and Blue, balances out the sweetness of the jam and compliments the saltiness of the blue cheese. Mayo is now my go-to for grilled cheeses. The Extras. This is where your creativity shines. Adding one, two, three extra ingredients will up your grilled cheese game. The extras should be minimal, and should compliment and bring out the flavor of the cheese(s). After all, it’s a grilled CHEESE, so the cheese should be the star. In this Black and Blue, the sweetness of the blackberry jam compliments the cheeses and brings out its salty, tangy quality. The tarragon adds a light freshness to an otherwise heavy sandwich. (Fresh basil would also be delicious here!) And the black pepper brings a little spice and warmth to further balance out the sweetness of the jam. Heat. I prefer cooking my grilled cheese on either a flat griddle (for ease of flipping) or in a cast iron pan (for even cooking). Whatever you use, make sure you heat the pan up first and add a little bit of butter or cooking spray before adding your bread. I like to cook my grilled cheese over medium heat, or slightly under medium. This will provide enough heat to melt the cheese but also toast the bread fairly quickly and evenly. I also like to cover the pan with a lid in order to trap the heat and melt the cheese even better. You can also assemble your sandwich first and cook it one side at a time, but with these big “fancy” grilled cheeses, flipping them without having it all fall apart can be tricky. (And messy!) So I prefer to cook the top and bottom slices at the same time, then sandwich the slices together when they’re finished cooking. It so much easier and less messy that way. BLACK AND BLUE GRILLED CHEESE Makes 2 sandwiches INGREDIENTS:
4 slices of Como bread of French bread, sliced 3/4” thick 1/4 cup + 2 tbsp. mayonnaise 1 tsp. black pepper 3 tbsp. seedless blackberry jam 2 tbsp. fresh tarragon, roughly chopped 2 oz. gorgonzola cheese 3 oz. Tillamook extra sharp white cheddar cheese 1 tbsp. butter INSTRUCTIONS: In a small bowl, mix together the mayo and black pepper. Spread 1-2 tbsp. of the mayo mixture on the outsides of each bread slice. Heat a large skillet over medium heat, and add the butter to melt. Set the bread slices in the hot skillet, mayo side down. On one half of each sandwich, spread 1 1/2 tbsp. of blackberry jam and top with 1 tbsp. tarragon and 1 oz. of gorgonzola. On the other half of each sandwich, place 1 1/2 oz. of white cheddar. Cover the skillet and cook until the bread slices are golden brown on the bottom and the cheddar has melted. Put the two halves of each sandwich together, cut the sandwiches in half, and serve. This salad is basically spring on a plate. Seriously, it is so light and refreshing.... a welcomed change after all the heavy winter comfort foods. A panzanella salad is an Italian chopped salad that's popular in the summertime. Rather than being served on a bed of leafy greens, a panzanella is made with chopped up fresh vegetables, stale bread, fresh herbs, and traditionally tossed with a red wine vinaigrette. The vinaigrette soaks into the bread and softens it some. The result is salad that's bursting with fresh flavor. This Spring Green Panzanella is my take on the traditional panzanella salad, using spring vegetables and all the fresh herbs. 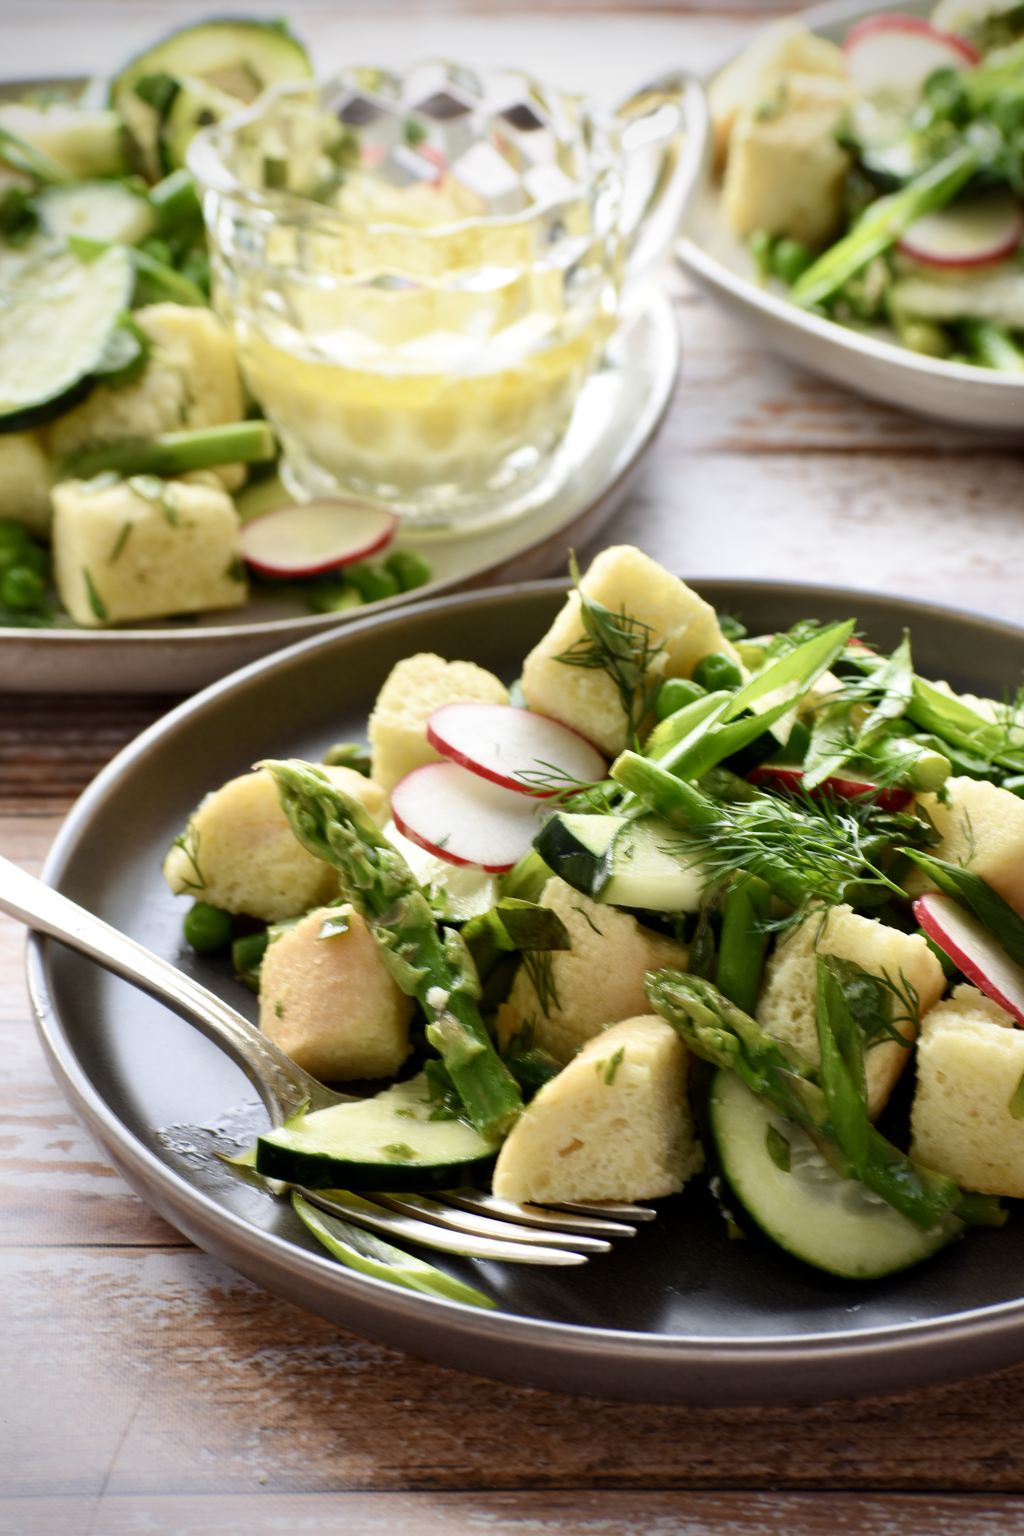 One of the best things about this panzanella, aside from the fresh factor of course, is how incredibly easy it is to make! You literally chop everything up and toss it together. And that's it! When you're at the grocery store or farmers market shopping for all these ingredients, it may feel like you're buying the whole produce section, and you may be questioning some of the vegetable and herb combinations, but trust me, they all create a magical blend. For the bread, I prefer a neutral and basic baguette, but any other artisinal loaf would work here. Sourdough bread, for example, would be quite delicious with this recipe! The trick is making sure it's nice and stale before making this salad. You can do so by buying the baguette a couple days earlier. Or cutting the bread into the 1" cubes and letting them sit out in a single layer on a baking sheet overnight. You don't want to toast the bread, as that will give you croutons and will give the salad a different flavor and texture. It should retain a raw quality. Feel free to chop the vegetables and herbs to your liking. Typically, panzanella salads will have larger chunks of vegetables. For reference, I aim to chop mine to a size where you could take about 2-3 pieces in one bite. If you'd like to peel and core the cucumber, go for it! If you'd prefer to chop everything up smaller, go for it! If you'd prefer to finely mince all your herbs, go for it! The point is: There's really no rules here! Just make sure you have all the ingredients, chopped and tossed together. Simple as that! 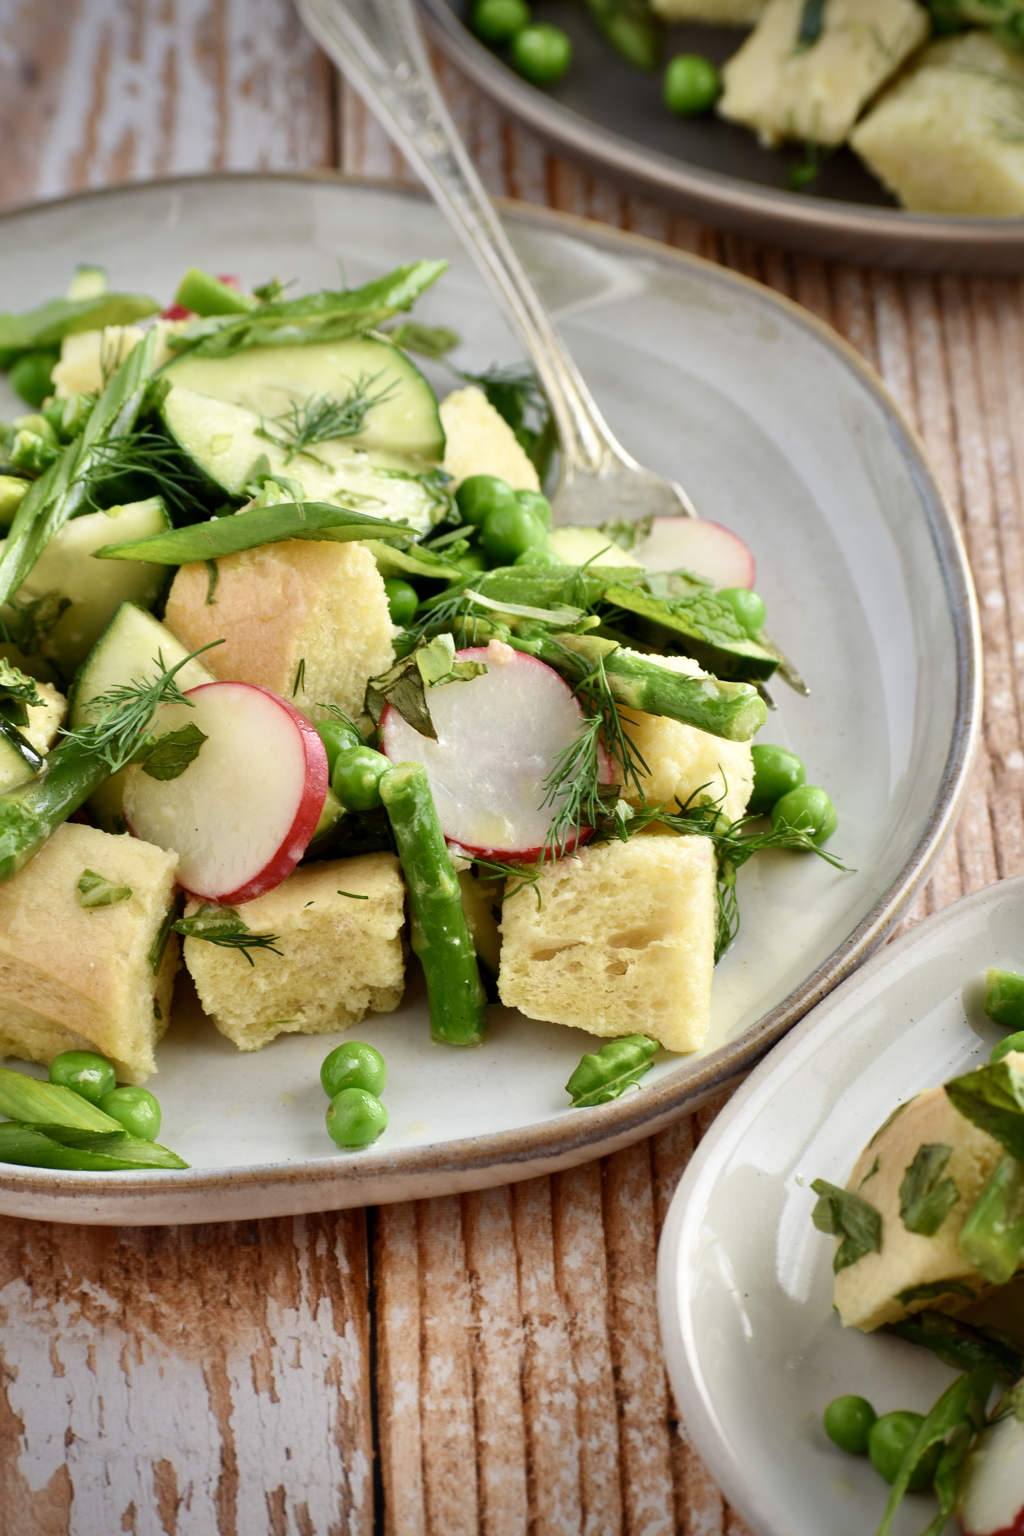 SPRING GREEN PANZANELLA SALAD Makes about 4 servings INGREDIENTS:
Salad: 4 cups stale/2-day old French bread, cut into 1” cubes 2 cups asparagus, cut into 1-2” pieces 1/3 cup English peas (you could use snap peas or frozen peas too, just make sure they're thawed) 1 cucumber, halved or quartered lengthwise, then sliced 4 green onions, green parts only, thinly sliced 3 radishes, thinly sliced 1 tbsp. lemon zest 2 tbsp. fresh dill, roughly chopped 1 tbsp. fresh tarragon, roughly chopped 1 tbsp. fresh mint, minced 1 tbsp. fresh basil, roughly chopped Buttermilk Dressing: 3 tbsp. buttermilk 3 tbsp. lemon juice 6 tbsp. olive oil INSTRUCTIONS: In a large bowl, toss together all the salad ingredients. In a small bowl, whisk together the buttermilk dressing ingredients until combined. Pour the dressing over the salad and toss until well coated. Allow the salad to rest for at least 15 minutes in the refrigerator, or up to 1 hour before serving. 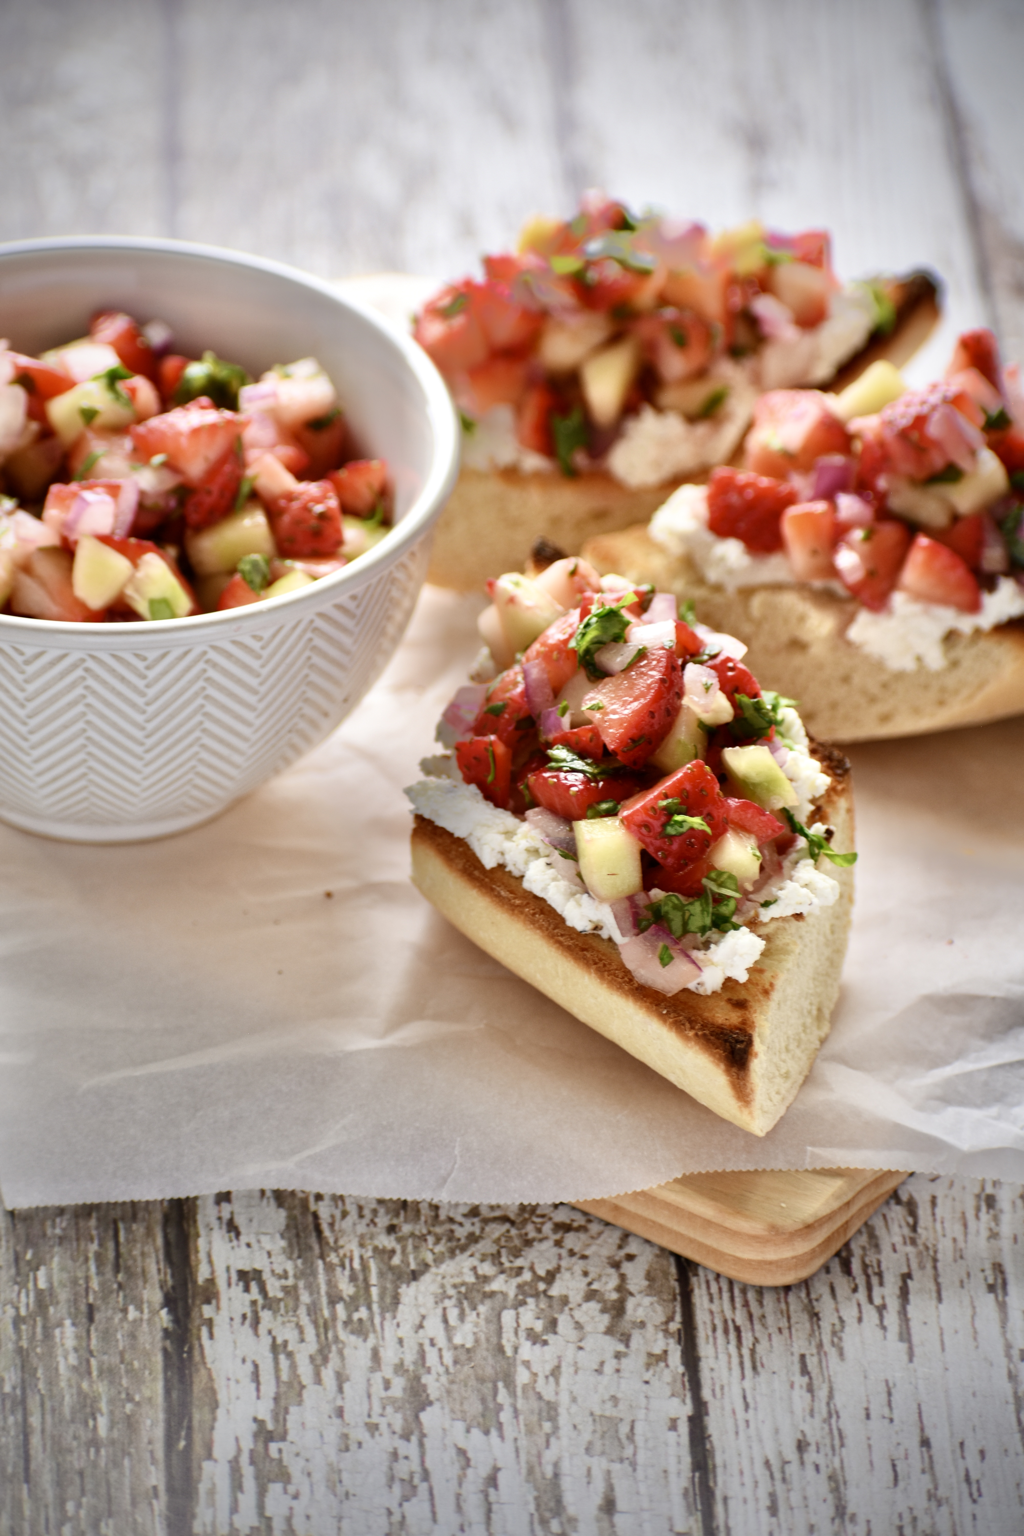 STRAWBERRY SALSA CROSTINI Makes 6 servings INGREDIENTS:
Strawberry Salsa: 8 oz. fresh strawberries, diced small 1/2 a cucumber, peeled, cored, diced small 1/4 of a red onion, minced 2 tbsp. fresh basil, minced Juice from 1/2 of a lime 1 tbsp. olive oil 1/4 tsp. salt Crostini: 1/2 of a baguette 4-6 oz. goat cheese 1/2 tsp. cracked black pepper 1 tsp. olive oil INSTRUCTIONS: Preheat broiler to 500° F. In a medium bowl, gently toss together all the ingredients for the salsa. Set aside. (The salsa may be made up to 2 hours in advance.) Slice the baguette in half lengthwise, then cut each half into 3 pieces at a 45° angle. Place the bread on a baking sheet with the cut side facing up. Place under the broiler for a couple minutes until toasted. Keep a close eye on the bread, as it will toast quickly and may burn easily. Remove from oven and allow to cool. In a small bowl, mix together the goat cheese, black pepper, and olive oil until smooth and spreadable. Spread the goat cheese evenly on the toasted bread slices, then top with a generous portion of the strawberry salsa. Transfer to a serving platter and serve immediately. 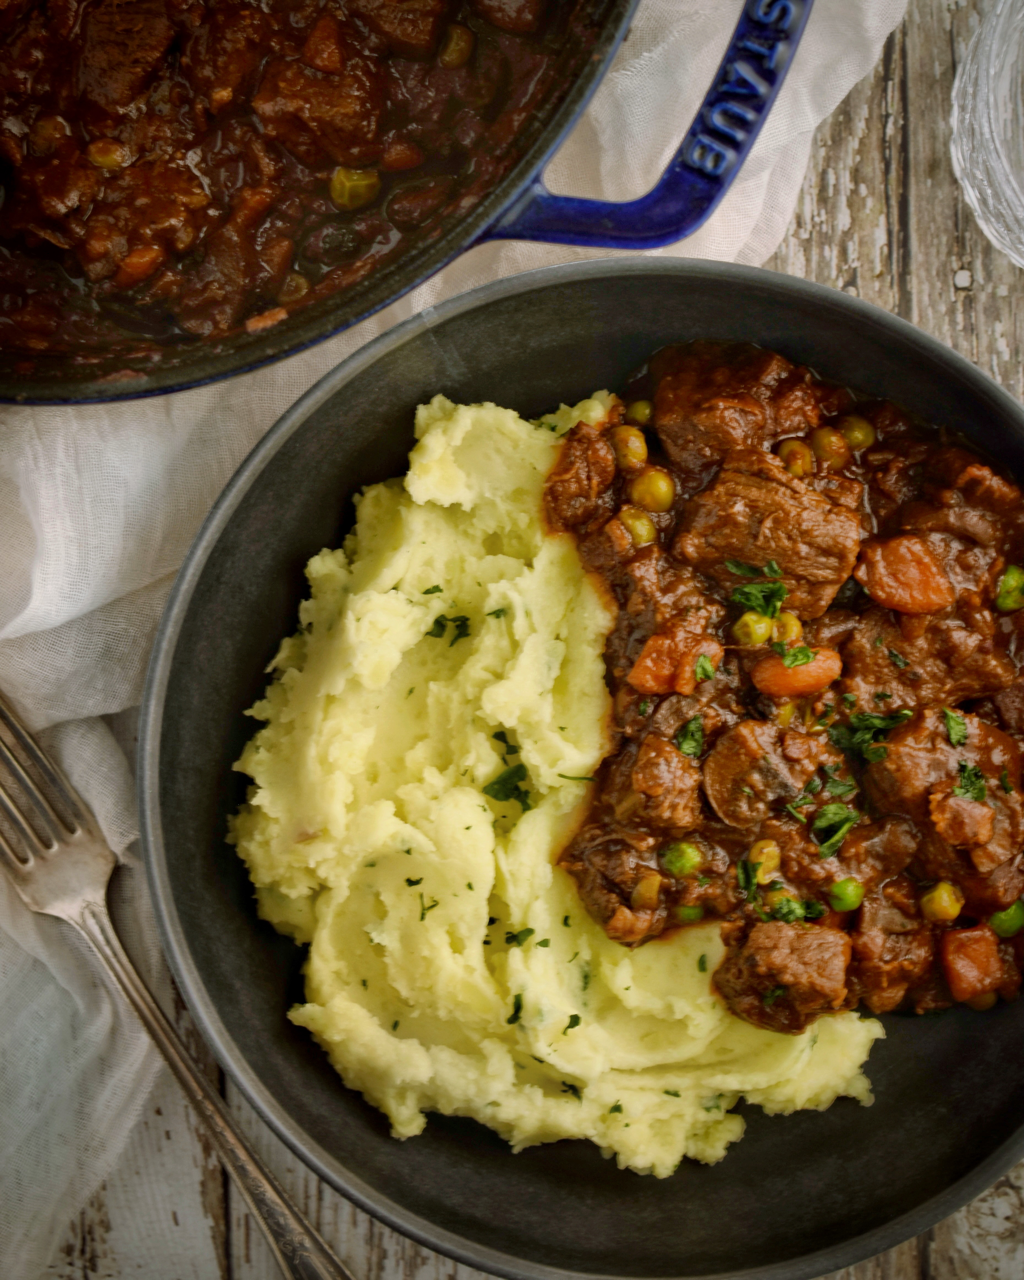 HEARTY GUINNESS BEEF STEW Makes 6-8 servings INGREDIENTS:
6 strips bacon, thinly sliced 2 pounds stew meat or chuck roast, chopped into large chunks 2 tbsp. butter 1 onion, diced 2 carrots, halved and sliced 2 celery stalks, diced small 2 cups cremini mushrooms, chopped 4 garlic cloves, roughly chopped 2 tbsp. flour 1 tbsp. Worcestershire 14 oz. (1 can) Guinness extra stout 3 cups beef broth 3 tbsp. tomato paste 2 bay leaves 1 tbsp. fresh thyme, minced 1 tbsp. fresh rosemary, minced 1 cup frozen peas 1 tbsp. cornstarch mixed with 1 tbsp. water INSTRUCTIONS: Heat a Dutch oven or stock pot over medium heat. Add the bacon and cook until crispy. Using a slotted spoon, transfer the bacon to a plate lined with paper towels. Set aside. Add the beef to the pot and cook for about 4-5 minutes or until meat is brown on all sides. Transfer the beef to a plate or bowl and set aside. Add the butter and once melted, add the onion, carrots, celery, and mushrooms. Cook the vegetables, stirring frequently, until the onions become translucent and begin to brown, about 8-10 minutes. Add the garlic and flour and cook for 2 minutes. Add the beef and bacon back to the pot. Stir in the Worcestershire sauce and cook for 1 minute, then slowly pour in the Guinness. Bring to a boil, and simmer for 5 minutes. Add the beef broth, tomato paste, bay leaves, thyme, and rosemary. Reduce heat to medium-low and simmer for about 2 hours, or until the beef is tender. Add the peas and cornstarch/water mixture and cook for 5-8 minutes. The stew should be nice and thick. If it needs to be a bit thicker, gradually add 1 more tbsp. cornstarch mixed with 1 tbsp. water. Serve in a bowl over mashed potatoes, or by itself. This is one of my, which I used to make about once a month when I was married. The pork comes out super tender, juicy, and full of flavor from the red rub, and cheddar grits with the pan drippings make a perfect pairing. 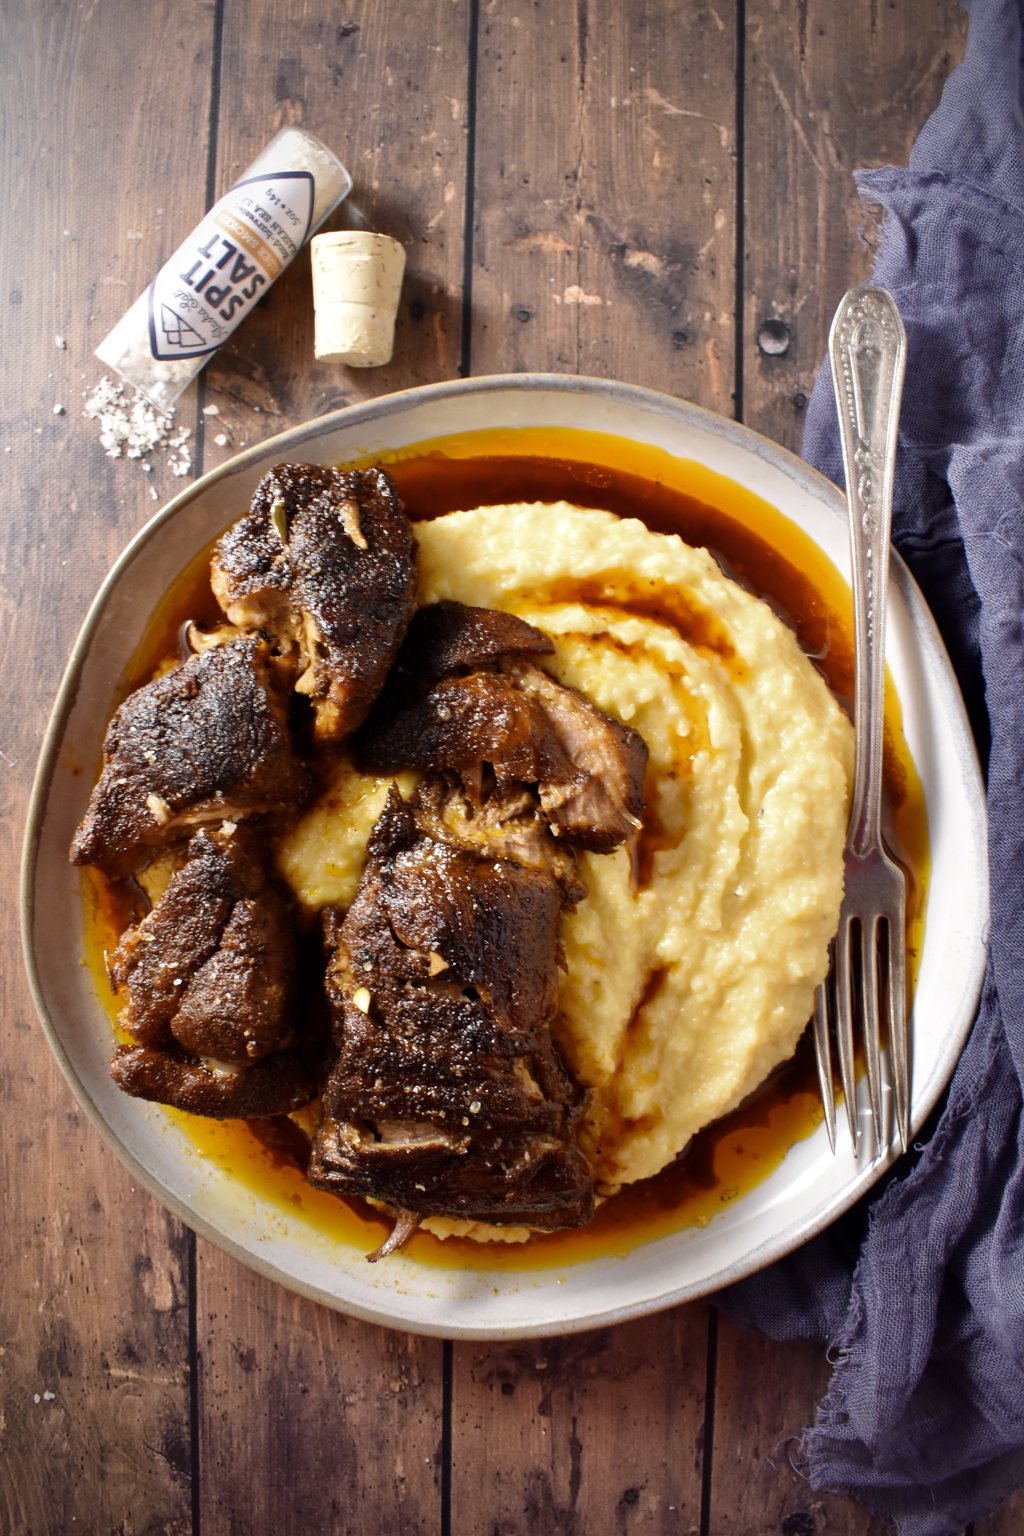 INGREDIENTS: Red Rub: 2 tbsp. smoked paprika 2 tbsp. chili powder 2 tsp. cumin 2 tsp. coriander 1 tsp. garlic powder 1 tsp. onion powder 1 tsp. salt 1/2 tsp. mustard powder 3 tbsp. dark brown sugar Pork: 4 boneless country-style pork ribs 2 tbsp. olive oil 6 large cloves garlic, roughly chopped 2 tbsp. apple cider vinegar 1-2 cups beef or chicken broth 1 tsp. liquid smoke 1 tbsp. Worcestershire sauce Cheddar Grits: 3/4 cup grits 1 cup water 1 cup chicken broth 1 cup whole milk 1 cup cheddar cheese 1 tsp. onion powder 1/2 tsp. salt INSTRUCTIONS: Preheat oven to 325° F. Pat the pork dry with paper towels, then rub all sides of the pork ribs with a generous amount of red rub. Allow to rest for about 15-30 minutes. Heat olive oil in a cast iron skillet or Dutch Oven over medium heat. Once hot, place the pork in the skillet and sear it for about 5 minutes or until you get some charred spots. Flip the pork, add the garlic, and cook for 5 minutes. Add the cider vinegar and cook for 1 minute, then add the broth, liquid smoke, and Worcestershire sauce. There should be enough broth to come at least 3/4 of the way up the sides of the pork, but not enough to cover it. Bring the liquid to a boil, then cover and place in the oven for 3 hours. Check the pork after 2 hours to make sure you still have about 1 inch of broth, and add more if needed. When the pork is done, remove it from the oven and keep it warm over low heat. Baste it a couple time with the pan drippings. Meanwhile, in a medium saucepan, bring the grits, water, broth, and milk to a boil over medium-high heat. Reduce heat to low, cover and simmer for about 10 minutes, stirring occasionally, until all the liquid is absorbed. Stir in the cheddar, onion powder, and salt. To serve, spoon the grits into the center of a plate or bowl. Place the pork on top of the grits, then drizzle with some of the pan drippings. BRAISED PORK AND CHEDDAR GRITS
Makes about 4 servings  LOADED HASHBROWN WAFFLES Makes about 4 waffles INGREDIENTS:
1 pound frozen hashbrowns, thawed (about 6 cups) 10 strips bacon, cooked, finely chopped 1 cup cheddar cheese, shredded 2 green onions, minced 4 eggs 1 tbsp. hot sauce (optional) 2 tbsp. fresh chives 1 tsp. salt INSTRUCTIONS: Preheat waffle iron. In a large bowl, mix together all ingredients until well combined. Lightly spray the waffle iron with oil, then place 1/2 cup of mix for each waffle, or as needed, using a spatula to press the hashbrowns down into the grooves. (I used a rectangular waffle maker, which took 1/2 cup mix per waffle and made 6 waffles total. For round waffle makers, you will probably need more like 1 cup of mix.) Close the lid to the waffle maker, pressing down into the mix. Cook for about 6-8 minutes, or until the waffle is golden brown. Transfer the waffle to a serving plate. Top with a fried egg, ketchup, and/or sour cream, and serve hot. I’ve been curious about pairing furikake with eggs, and as it turns out, I’m right! It is delicious! These soy marinated deviled eggs are topped with seto fumi furikake, a Japanese seasoning which has sesame seeds, seaweed, dried bonita, and dehydrated egg yolk, among other things.  SOY MARINATED DEVILED EGGS Makes 12 servings INGREDIENTS:
Marinade: 3/4 cup soy sauce 4 large garlic cloves, roughly chopped 1 tbsp. fresh ginger, grated 1 tbsp. sambal (or sriracha) 1/4 cup tbsp. rice vinegar Eggs: 6 eggs, at room temperature 1/3 cup mayonnaise 3/4 tsp. sesame oil 1 tsp. sambal (or sriracha) 1 tsp. chives, to garnish 1 tsp. seto fumi furikake (containing bonita and egg), to garnish* *If you don’t want or can’t find furikake, you can use sesame seeds to garnish instead. INSTRUCTIONS: Fill a small saucepan about 1/2 to 3/4 full with water and bring to boil over medium-heat. Using a large ladle or spoon, slowly and carefully lower the eggs into the water one at a time. Lower the heat to medium and boil the eggs for 10 minutes. Remove from heat and drain the water from the pan. Fill the pan with ice and cold water, then let the eggs sit for about 5 minutes, adding more ice as needed, until the eggs are fully chilled. Carefully peel the eggs, rinse, and set aside. In a small bowl, mix together the marinade ingredients. Add the hard boiled eggs. If needed, add a little more soy sauce until it covers all the eggs. Cover the dish and refrigerate for 2-3 hours. Remove the eggs from the marinade and pat dry with a paper towel. You can discard the marinade or keep it for other dishes. (It’s still good since the eggs were fully cooked.) Using a sharp knife, cut the eggs in half lengthwise. With a spoon, scoop the egg yolks out from the egg whites and place the yolks in a small bowl. Add to the bowl the mayo, sesame oil, and sambal. Whisk the yolks until the mixture is smooth. Spoon or pipe the egg yolk mixture back into the egg whites, arrange them on a serving platter, garnish with fresh chives and furikake, then serve. If you are not serving the eggs right away, keep them refrigerated and garnish just before serving. There are a few reasons why I love this dish:
I love dishes that are this flexible! And this delicious! It is warm and earthy and screams to be enjoyed with glass of red wine, sitting near a toasty fire. 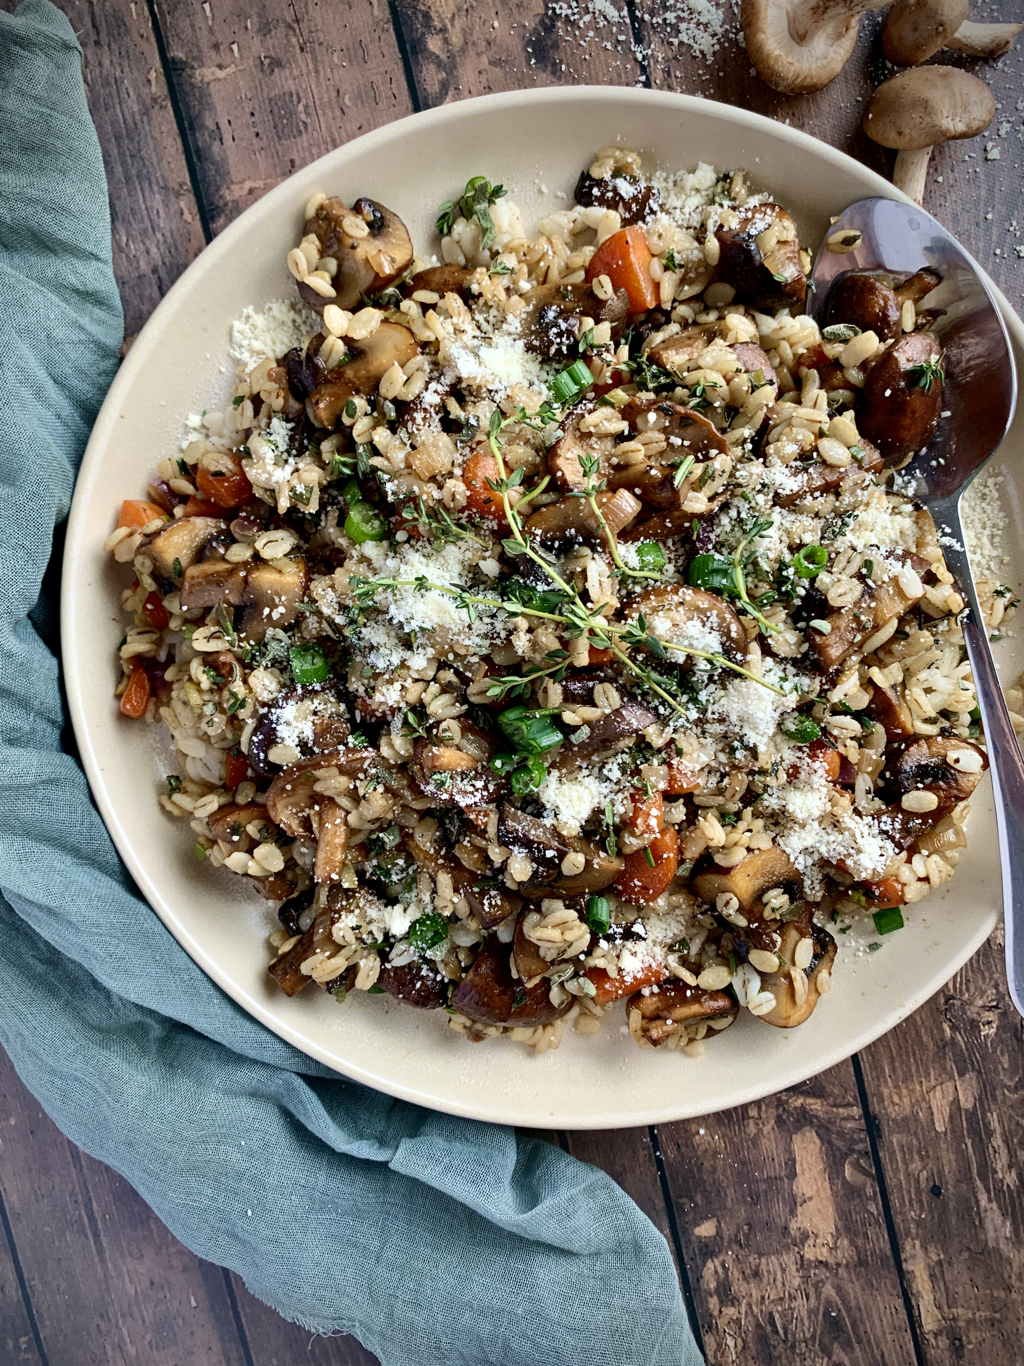 Makes approx. 2 entree-sized servings or 4-6 side dish servings
INGREDIENTS: 1 cup quick-cooking barley 2 1/2 cups beef broth 4 cups cremini mushrooms, quartered 2 cups shiitake mushrooms, whole (any other variety of mushrooms to your liking should do) 2 large carrots, diced small 1 tbsp. olive oil (or truffle oil) 1/4 cup butter 1 tsp. salt 1 shallot, minced 5 garlic cloves, minced 2 tbsp. flour 1 cup beef broth 1 tbsp. Worcestershire sauce 1 tbsp. fresh thyme, minced 1 tbsp. fresh rosemary, minced 1 tbsp. fresh sage, minced 1/4 cup toasted walnuts, chopped (optional) 2 green onions, green part only, thinly sliced 1/4 cup parmesan, grated Fresh thyme, to garnish INSTRUCTIONS: In a small saucepan over high heat, bring beef broth to a boil, then add the quick-cooking barley. Reduce the heat to medium-low, cover with a lid, and simmer for about 10-12 minutes, or until all moisture has been absorbed and barley is tender. While the barley is simmering, you can start sautéing the mushrooms. (See below.) Once the barley is finished, set it aside. In a large skillet over medium heat, add the olive oil and butter. Once the butter is melted, add both types of mushrooms and the carrots. Sprinkle them with salt and let them cook for 2 minutes untouched, then stir frequently while cooking for about 7-8 minutes, or until carrots are tender. Add the shallot and garlic and cook for 1 minute, then add the flour and cook for 1 minute. Stir in the beef broth, Worcestershire, fresh herbs, walnuts, and green onion. Cook for 2 minutes, then stir in the barley. Transfer to a serving dish and top with parmesan cheese and fresh thyme. Serve hot. This goat cheese dip is tangy, creamy and super quick and easy to make! Whipping the goat cheese with yogurt makes it light and fluffy, which is a nice contrast with the olive oil and chunky tomatoes. Serve alongside some light crispy crackers or some toasted artisan bread. In this recipe, I use a balsamic glaze, which is thick and syrupy. You can usually find a bottle by the balsamic vinegars at the grocery store. Trader Joe’s has a nice one. If you can’t find it, you can quickly make a balsamic glaze by simmering 1/2 cup balsamic vinegar and 1/4 cup honey over medium heat for 5-10 minutes. 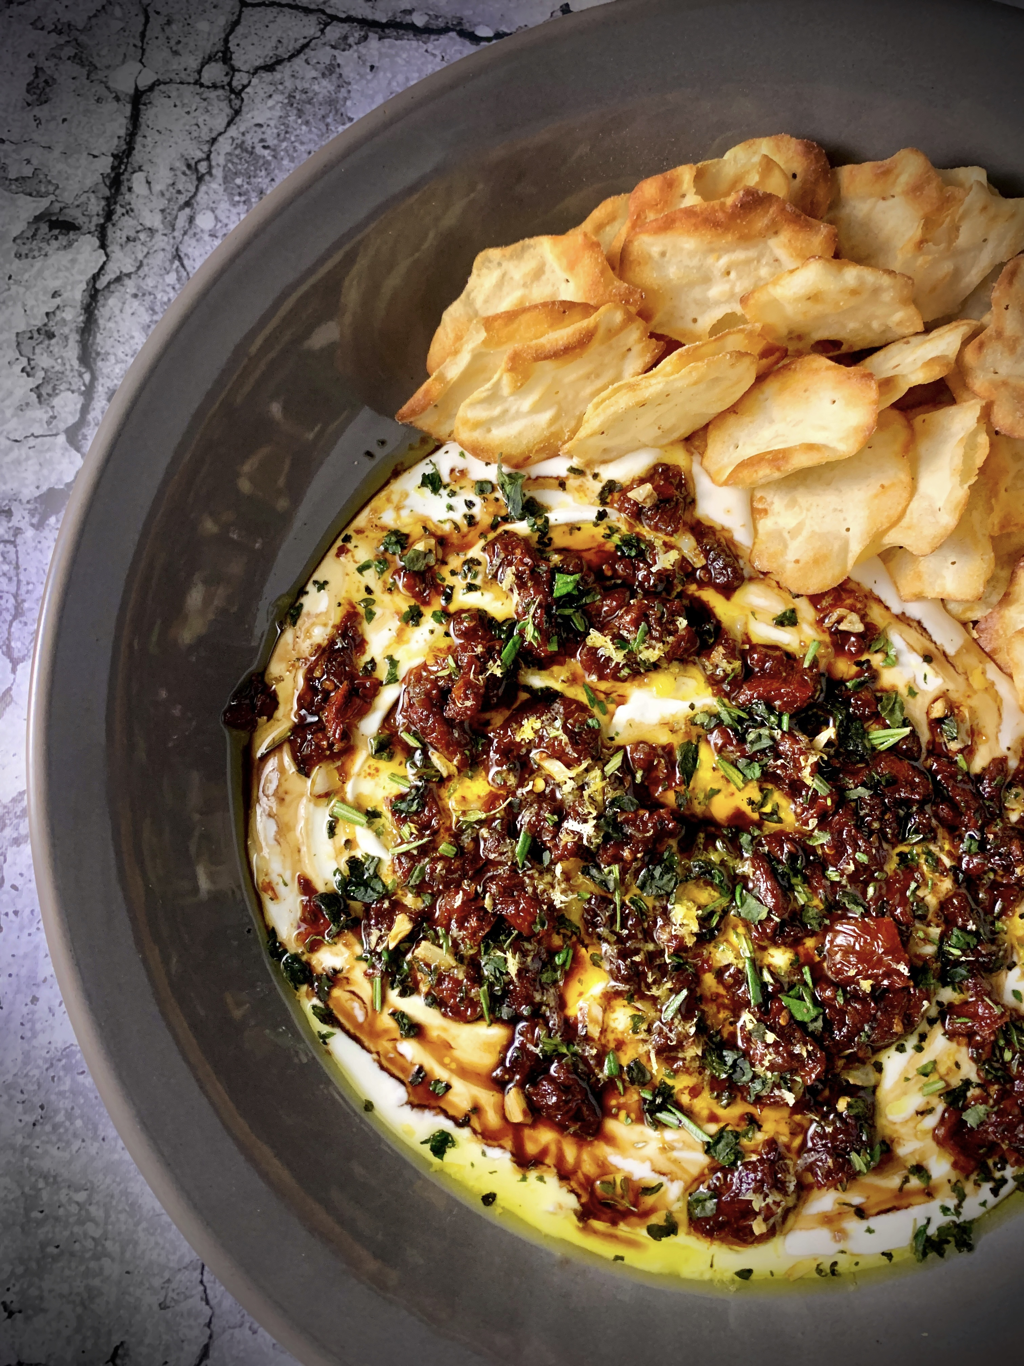 INGREDIENTS:
10 oz. goat cheese 5 oz. plain Greek yogurt 1 tsp. lemon zest 1/4 cup olive oil 3 garlic cloves, roughly chopped 1/2 tsp. red pepper flakes 1/2 cup sundries tomatoes, packed in oil, chopped 1 tbsp. balsamic glaze 2 tbsp. fresh basil, minced 1 tsp. fresh thyme leaves 1 tsp. fresh rosemary, minced Crackers or toasted bread, to serve INSTRUCTIONS: In a food processor or blender, combine the goat cheese, yogurt, and lemon zest. Pulse and whip the mixture until smooth and fluffy, about 3-4 minutes. Set aside. Heat the olive oil in a small saucepan over medium-low heat. Add the garlic and cook for 1 minute, then add the red pepper flakes and sundried tomatoes and cook for 1 more minute. Remove from heat and allow to cool slightly. Spread the goat cheese mixture in the bottom of a serving bowl. Pour the sun-dried tomato and olive oil mixture on top. Drizzle evenly with balsamic glaze and top with the fresh basil, thyme, and rosemary. Serve alongside your choice of crackers or toasted bread. |